Friday, December 30, 2016

Slow Cooker Teriyaki Chicken

Last Year's Post: Hot and Sour Soup
Two years Ago:  Korean Seafood Pancakes

I had a love/hate relationship with my slow cooker for years.  I originally bought it thinking it would be great for cooking a meal during the work week, but then I realized that if you have an 8-5 job very few recipes call for cooking the 10-11 hours that you'll be gone.  So, it turned into more of a weekend or day-off type of meal prep when the recipe particularly benefits from low and slow cooking.

Boneless skinless chicken thighs are one of those things.  They're perfect for the slow cooker because they stay moist while they become fall-apart tender.  It's actually the only way I cook chicken thighs because they can turn tough and chewy when cooked faster at higher heat. No one likes chewy chicken.

This is a simple yet very flavorful recipe for teriyaki chicken.  You could even just buy a bottle of teriyaki sauce if you're really pressed for time, but the homemade sauce allows you to control sodium and vary the other ingredients according to your family's taste.  More garlic, anyone?  Tip of the day:  Trader Joes has excellent soy sauce that has one of the lowest sodium levels I've found.


Don't be tempted to substitute cooking sherry for the dry sherry because it tastes bad and it has sodium.  Salted wine?  No thanks.  Buy a bottle of dry sherry at the liquor store and keep it on hand - it tastes much better, it's not expensive and it keeps forever.

Kids love teriyaki, so this is a great family meal when paired with white or brown rice and some sauteed sugar snap peas.  Leftovers make an excellent lunch the next day - warm, cold, or in a sandwich with some sliced cucumbers.

print
Slow Cooker Teriyaki Chicken
Serves 4-6

2 pounds boneless skinless chicken thighs
1/2 cup low-sodium soy sauce

3 tablespoons brown sugar
1 tablespoon dry sherry
3 cloves minced or grated garlic
Slice green onions, for garnish
Toasted sesame seeds, for garnish


In a small bowl, mix soy sauce, brown sugar, sherry and garlic together.

Place chicken in the slow cooker, cover with sauce.  Cook on low for 6-8 hours, or on high for 4-5.  Serve with green onions and toasted sesame seeds on top.


Friday, December 23, 2016

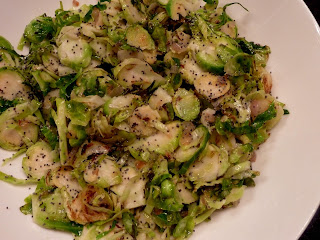
Sautéed Brussels Sprouts with Poppy Seeds

Last Year's Post: Italian Grilled Seafood Salad
Two Years Ago:  Cheddar Olives

A few years ago a relative made this recipe for Thanksgiving dinner.  I've spent most of my life avoiding Brussels sprouts because I'd only had them whole and steamed, which makes them taste like little cabbages.  Yeck.  But, it was Thanksgiving and I wanted to be polite so I tried them and was surprised to find that I really like them prepared this way.  They're tender but still crisp, and very delicious.  We had them last night with smoked turkey and wild rice and it was excellent.  They make a great side dish for any meat or poultry just like any other green vegetable.

Brussels sprouts are a superfood  - they're a good source of protein, iron and potassium, plus they contain Vitamin C, fiber, and antioxidants.  If you can find a recipe that you like, they're a good addition to a healthy diet.  As my mom would say, "try it - it could be your new favorite thing".  Classic mom line.


print
Sautéed Brussels Sprouts with Poppy Seeds         
 Serves 6

1 ½ pounds Brussels sprouts, trimmed
3 tablespoons olive oil
1 large shallot, finely chopped
2 tablespoons white wine vinegar
1 tablespoon poppy seeds


In a food processor fitted with a slicing disk, slice the Brussels sprouts (or halve and thinly slice by hand).

In a large skillet, heat the oil over medium heat.  Add the shallot and cook, stirring often, until beginning to soften, 2 minutes.  Add the Brussels sprouts. ½ teaspoon salt and ½ teaspoon pepper to the skillet and cook, tossing often, until the sprouts are tender, 4-6 minutes.  Remove from heat and stir in the vinegar and poppy seeds.  Serve immediately.


To prep ahead: slice the sprouts up to 2 days ahead and refrigerate, covered. 

Friday, December 16, 2016

Spiced Pecans

Last Year's Post:  Sugar Snap Pea Salad
Two Years Ago:   Kale and Pancetta Salad

Just a warning, these pecans are addictive.  They're a perfect nibble with a cocktail, and make a great gift.  But actually I like to make and keep a batch in the freezer for a different reason entirely - they're great in salads.  We had a green salad with smoked turkey, apple, blue cheese and these pecans last night, and the salty/sweet/spicy notes of the pecans really added that extra something.  I could also see adding them to your favorite chicken salad sandwich, or a cold pasta salad.

They're really easy to make as long as you keep your eye on them while they're baking and stir them occasionally so they don't get too brown on one side.  The salt and sugar don't melt, but they do stick to the nuts and give them a nice additional crunch.  Just be sure to stir the nuts well so the spices and sugar are evenly distributed before they go in the oven.

My suggestion is to make the recipe once as written, then increase the cayenne if you want them spicier.  As written, they have a little kick but not enough to prevent you from probably eating too many.  Like I said, addicting.

print
Spiced Pecans
Makes about 2 ½ cups

1 (10 ounce) package pecan halves
2 tablespoons unsalted butter
1 ½ teaspoons ground cumin
¼ teaspoon cayenne pepper
2 tablespoons sugar
1 teaspoon salt


Preheat oven to 300d.

Place pecans in a medium bowl.  Melt butter in a heavy small pot, then add cumin and cayenne and stir until aromatic, about 15 seconds.  Pour Over pecans.  Add sugar and salt and stir to coat.  Transfer to a foil-lined baking pan and spread out in one layer.

Bake until the nuts are toasted, stirring every 5 minutes, about 20 minutes total.  Let cool.

Store in an airtight container for up to 5 days, or freeze for 30-60 days.


Friday, December 9, 2016

Baked Egg Bowls

Last Year's Post: Southwest Eggrolls (baked not fried)
Two Years Ago:   Bang Bang Turkey

These egg bowls are basically little quiches baked in a roll.  They're great for a birthday or holiday breakfast and really fun if you're entertaining a group for brunch.  Set out a number of fillings and let everyone choose their own, then have a big pitcher of the beaten egg mixture at the end to fill each roll as they're done.  Put them on one or two big baking sheets lined with parchment (and have everyone write their initials on the parchment next to their bowl so you can remember whose is whose) then serve Bloody Marys, Bellinis, Mimosas or a variety of juices while they bake.  Complete the meal with a big fruit salad and you're done because the egg bowls are quite filling.

I particularly like that beaten eggs are used rather than cracking an egg on top of each one and trying to pull each bread bowl out of the oven at the exactly right second when the egg yolk is cooked just to that person's preference (and hopefully the whites are fully cooked).  Who needs that kind of pressure?  Although the individual bowls are especially cute, you could also use longer loaves and cut them into pieces for serving.  But I love the idea of letting each person make their own.  Here are some ideas for fillings to set out:

Meats:  diced ham, cooked hot or mild Italian sausage, cooked crumbled bacon, cooked chorizo
Vegetables: diced red onion, sliced green onions, sauteed diced bell peppers, chopped spinach, sauteed mushrooms, chopped kale, diced jalapenos
Herbs:  cilantro, parsley, basil, thyme
Shredded cheeses:  mozzarella, Gruyere, fontina, pepper jack

Assembly is easy.


The only caution is to be careful when you're tearing out the insides of the bread so you don't go too far and rip a hole. That would be bad.  I used Asiago telera rolls because I liked the size and shape and thought the Asiago might add some extra flavor.


The other thing I like is that the edges of the bread get crispy while the bottom remains soft.  If using rolls, you could toast the top of the roll (or not) to serve alongside the bread bowl for those who might want to eat it like a sandwich (can you say kids?).   Be sure to let the rolls cool for at least 10 minutes before letting anyone chomp into it like a sandwich because they're quite hot and retain the heat remarkably well when enclosed.  Speaking from experience, burning the roof of your mouth is not fun.


print
Baked Egg Bowls
Serves 10
Note:  any type of cooked meat, vegetables, cheeses and herbs may be substituted.

10 round Kaiser or Telera rolls, or 2 (1-lb) Italian of French baguettes, 14”x4”, unsliced
8 oz. hot or mild Italian sausage
1 medium red or yellow sweet pepper, chopped
½ cup sliced green onions (about 4 total)
10 eggs, lightly beaten
2/3 cup whipping cream or half-and-half
¼ cup snipped fresh basil
½ teaspoon salt
1 ½ cups shredded Gruyere or mozzarella cheese (6 oz)


Preheat oven to 350d.

Line a 15x10x1-inch baking pan with parchment paper.  Using a serrated knife, cut the top off the rolls (or cut a wedge into the top of each long loaf, cutting to about 1 inch from each long side).  Use a spoon or your fingers to carefully remove the inside of each roll or loaf, leaving about a ¾” thick shell.  Arrange bread shells on the prepared baking pan.

Remove casings from sausage if present.  In a large skillet, crumble and cook sausage until just cooked through; add peppers and green onions and sauté one minute more. Remove from heat; drain off any fat.

In a large glass measure combine eggs, cream, basil and salt. 

In each bread shell, layer the sausage mixture and divide up 1 cup of the cheese. Carefully pour egg mixture into bread shells.  Sprinkle with the remaining cheese.  Bake, uncovered, for 35 to 40 minutes or until eggs are set and the top is lightly browned. 

Let stand for 5 minutes to cool slightly.  If using long loaves, carefully cut into 5 slices each using a serrated knife.
  

Prepare Ahead: cook the sausage, peppers and onions in advance; cool store covered in the refrigerator.  When ready to bake, proceed with the remaining instructions.

Friday, December 2, 2016

Wheatberry Salad

Last Year's Post: Turkey Farro Salad with Candied Chickpeas
Two Years Ago:   Beer Cheese

Wheatberries are literally the entire kernel of wheat, minus the hull.  They're an excellent source of protein, potassium, dietary fiber and iron. But that's not why I like them so much - it's because they're a wonderfully chewy grain that makes a substantial salad that doesn't wilt, and they're a neutral canvas that absorbs the flavors of the vinaigrette.  In this recipe, the vinaigrette delivers a garlic and vinegar profile while the veggies and almonds add flavor, color and texture.  It's one of my favorite salads and is perfect served along side any roasted or grilled meats or poultry.


Wheatberries are very trendy right now in grain bowls and added to salads in restaurants, but 10 years ago when I first found this recipe they were pretty exotic and found only in natural food stores.  That's still your most likely place to find them, but I've seen them occasionally in the bulk food aisles of regular grocery stores.

Be aware that wheatberries need to soak overnight (or cook longer) to soften the hard outer covering and even then they cook for 90 minutes.  Your best bet is to make this salad the day ahead - it tastes better the next day anyway because all the flavors have a chance to blend.


print
Wheatberry Salad
6 servings

This salad gets better as it sits, so try to make it the day before serving.  

1 cup wheatberries                                                    
6 cups water or low sodium chicken broth                
½ teaspoon kosher salt                                             
1 bay leaf                                                                    
½ cup chopped artichoke hearts                                  
½ cup quartered cherry tomatoes
½ cup diced roasted red peppers
2 tablespoons capers, rinsed
3 tablespoons sliced green onions
¼ cup toasted sliced almonds
2 tablespoons chopped fresh basil or cilantro

Vinaigrette
1 teaspoon finely minced garlic
2 tablespoons fresh lime juice (don’t use bottled)
1 tablespoon white wine vinegar
¼ cup extra virgin olive oil
Salt and pepper


In a saucepan with a well-fitted lid, put the wheatberries, water, salt and bay leaf.  Bring to a boil and then simmer, covered until the wheat berries are pleasantly chewy (about 90 minutes). Remove the pan from the heat, discard the bay leaf, let the berries cool in the liquid. 


When cool, drain and put the wheat berries in a large bowl.  Add the remaining salad ingredients.  Make the vinaigrette by whisking all the ingredients together.  Toss with the salad.  Let sit for about 30 minutes at room temperature (or longer, refrigerated) before serving.